Entering required data and documentation

When you create your LutinX account, entering the correct data and uploading valid documents is essential to verify your identity and activate all platform features securely.
This step ensures your profile is accurate, compliant with KYC/AML standards, and ready for blockchain-certified activities such as document registration, certification, and ownership proof.

By providing the required information, you:

  • Confirm your real identity to become a Certified User (Blue Check).

  • Enable access to the Dashboard and available applications.

  • Ensure that every certification or document registration is legally valid.

  • Protect your data under strict GDPR and eIDAS compliance.

LutinX verifies and encrypts your information using secure infrastructure, guaranteeing that your identity and uploaded files are handled safely and used only for legitimate verification purposes.

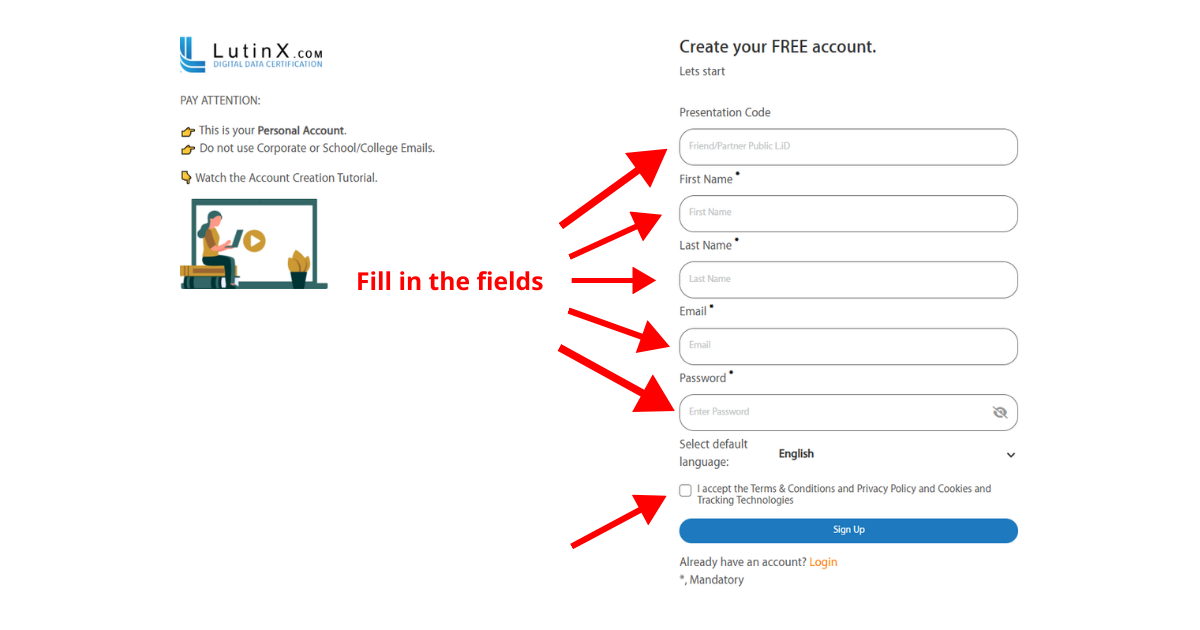
Follow the steps below carefully and use the screenshot as a reference:

These steps are necessary to make sure your account is correctly created and ready to use.

1. Personal (FREE) Account Creation

Step 1 – Presentation code

  • The Presentation Code field is not mandatory: you can complete the registration even if you leave it empty.

  • If you already have a code from a friend or a LutinX partner, it is recommended to enter it here.

  • If you don’t have a code but would like to use one, you can request it from Support.

Step 2 – Personal information

Fill in the following fields in the registration form:

  • First Name (your given name)

  • Last Name (your family name)

  • Email address (must be valid, you will receive your User Code here)

  • Password (choose a secure password you can remember)

💡 Tip: Use a password with at least 8 characters, including numbers and symbols, for security.

Step 3 – Confirm your details

  • Review the information you entered.

  • Make sure the email address is correct.

  • Check your password meets the security requirements.

Step 4 – Finalize registration

  • Select your preferred language.

  • Accept Terms & Conditions and Privacy Policy.

  • Click Sign Up.

Note: at this point your account is created. You will see a green confirmation message on the page and receive an email with your User Code, which will be required for your first login.

1. Business Account Creation

Step 1 – Presentation code

  • The Presentation Code field is mandatory.

  • If you do not know anyone who participates in our REFERRAL Program, please contact our Support Team to receive a proper PRESENTATION code.

  • Presentation codes can be granted by our Local Partners around the world.

Step 2 – Organization details

Fill in the required business information:

  • Organization Name (official name of your company or activity).
    ⚠️ Write it correctly, otherwise you will need to contact Support Team to change it.

  • Director First Name (legal representative’s first name).

  • Director Last Name (legal representative’s surname).

  • Company Email (must be valid, all communications including your User Code will be sent here).

Step 3 – Security setup

  • Password → choose a secure password (at least 8 characters, with numbers and symbols).

  • Select Language → choose your preferred default language for the platform.

Step 4 – Review and confirm

  • Double-check all the data, especially Organization Name and Company Email.

  • Accept the Terms & Conditions and Privacy Policy.

  • Click Sign Up.

Step 5 – Account creation

    • Your Business Account is now created.

    • A green confirmation message will appear on the top right of the page.

    • You will also receive an email with your User Code, required for your first login.

⚠️ Note: Unlike Personal Accounts, Business Accounts do not include free registrations. To start protecting files, you must purchase a license (PRO or PREMIUM).